OpenAI Red Teaming Network
We’re announcing an open call for the OpenAI Red Teaming Network and invite domain experts interested in improving the safety of OpenAI’s models to join our efforts.
We’re announcing an open call for the OpenAI Red Teaming Network and invite domain experts interested in improving the safety of OpenAI’s models to join our efforts.

The 1960s saw massive upheaval across America, with the fight for civil rights, the growing anti-war movement, and other campaigns for social justice. As the counterculture bloomed and public dissent took hold, societal tensions were reflected in the rise of a new, daring cinematic movement.
Starting in 1967 with Bonnie & Clyde, the movement would become known as the New Hollywood. It turned its back on the costly studio musicals and historical epics of the 1950s, ushering in independent films helmed by young directors like Martin Scorsese and William Friedkin. The films were raw and violent, and challenged conservative views. They suggested a more radical future was available to the young audiences that flocked to the movie theatres.
Screening at Pictureville from 16 September, the new film season Look Who’s Back: The Hollywood Renaissance and the Blacklist aims to reassess the key influences behind this historic period of cinema. Screening classics like Serpico, M*A*S*H, and Midnight Cowboy, the season considers how the old Hollywood guard, blacklisted in the 50s, made a vital contribution to the reinvigoration of cinema in one of Hollywood’s most creative eras, and were just as influential as the young directors that would take the spotlight.

The Hollywood blacklist was an attempt to counter communist influence in American culture. It began in the years after the end of World War II when some of the USA’s former allies, particularly the Soviet Union, now became enemies.
A group of perceived communist supporters known as the Hollywood Ten were jailed, while another 151 actors, writers, musicians and broadcast journalists were named as communist sympathisers. This led to many being called before the newly formed House Un-American Activities Committee (HUAC), and the blacklisting of those who refused to collaborate.
As the 1950s progressed many of those blacklisted, including writers and composers, were forced to work under pseudonyms or fronts. For some directors and actors the blacklist led to either exile or inactivity, with many not being able to work in America again until the 1960s.
In the 1960s the blacklist began to break down after the release of two films written by Hollywood Ten member Dalton Trumbo, Exodus and Spartacus, and exiled figures came back into the fold. Influenced by the turmoil of the 1950s, these creatives returned to Hollywood with renewed vigour, fuelling a run of critically acclaimed, politically charged features that would reflect the turbulent times they lived through, finding fresh collaborators in the youthful and radical voices within the New Hollywood era.

Dassin had been blacklisted in the 1950s for his activism and communist sympathies. After exile in Europe (where he directed films in France and Greece), he returned to Hollywood with his 1968 classic Uptight. Set in the aftermath of the assassination of Martin Luther King, the film features all the political urgency expected of the era, with a script written in collaboration with activist Ruby Dee. Even during production Dassin couldn’t escape controversy, and some Uptight crew members acted as informants to the FBI, who closely monitored the making of the film.
After shooting a documentary about the Hollywood Ten, Berry was exiled to France and named as a communist. He kept in work by shooting the last Laurel and Hardy film, Atoll K, and returned to Hollywood in the 60s with some American Television, and eventually returned to American cinema with the remarkable, powerful drama Claudine.
Jailed for 12 months for contempt of Congress after refusing to testify in front of the HUAC, Lardner Jr. returned to Hollywood in 1965 with a credit for The Cincinnati Kid and would win an Academy Award for M*A*S*H, a satirical dark comedy set in the Korean War and directed by legendary auteur Robert Altman.
Unlike many targeted by the blacklist, Waldo Salt recovered triumphantly. After refusing to testify in front of HUAC in 1951, Salt had to write under a pseudonym for years until his reintegration in the late ‘60s. His screenplays for Midnight Cowboy and Serpico show his commitment to themes of corruption and injustice, casting an empathetic light on the underdog. Salt won an Academy Award for Midnight Cowboy, and a second win in 1978 for Coming Home suggested a full embrace of the once-exiled figure.
Though these creatives had acclaimed works in the New Hollywood era, the blacklist would forever define a huge part of their lives, and their own personal turmoil informed the passionate fury of these iconic films. Look Who’s Back is a vital cinema season that offers the chance for audiences to see these shocking, challenging masterpieces on the big screen.
Look Who’s Back: The Hollywood Renaissance and the Blacklist begins with Serpico on 16 and 17 September. For tickets to the full season, visit our website.
The season is presented as part of Cinema Rediscovered on Tour, a Watershed project in partnership with Park Circus. With support from BFI awarding funds from The National Lottery and MUBI.

We’re growing our presence in Europe with an office in Dublin, Ireland.


This tutorial on importing content into WooCommerce using the CyberSEO Pro plugin highlights the flexibility and power of integrating various content sources with an e-commerce website. By importing product lists from XML feeds, CSV files, JSON feeds, RSS feeds, and HTML web pages, website owners can automate the process of updating and managing their product catalog.
The use of custom fields allows for precise control over the imported data, including product attributes such as pricing, availability, and stock management. The ability to map XML tags, CSV columns, or JSON attributes to WooCommerce custom fields ensures that each imported product is accurately configured within the e-commerce environment.
Furthermore, the addition of artificial intelligence through the OpenAI GPT models offers a unique opportunity to enhance product descriptions with SEO optimization. By generating machine-generated content that reads like human-written text, website owners can improve the uniqueness and engagement of their product descriptions, ultimately leading to improved search engine visibility and customer satisfaction.
In terms of future developments, it is possible to envision further integration with additional e-commerce platforms beyond WooCommerce. By expanding the capabilities of the CyberSEO Pro plugin to support other popular e-commerce platforms such as Shopify or Magento, website owners would have even more options for importing content from various sources.
Additionally, advancements in artificial intelligence and natural language processing could lead to even more sophisticated content generation capabilities. This could include features such as automatic keyword optimization, dynamic pricing based on market trends, or personalized product recommendations based on customer preferences.

Important note: Despite the focus on WooCommerce in the title of this tutorial – it will teach you how to import content from various sources such as RSS, XML, JSON, CSV and HTML into WordPress posts of custom types using the CyberSEO Pro plugin – this article should be considered as a basic guide to creating custom fields for WordPress posts and working with CyberSEO Pro HTML post templates. The use of artificial intelligence for content import uniqueness will also be a topic of this article.
In this article, we’ll explore how to use CyberSEO Pro to import product lists into a WordPress website powered by the WooCommerce plugin. The key point to remember is that all WooCommerce products are essentially regular WordPress posts, but they belong to a specialized custom post type known as “product“. So, the first step in importing your RSS, XML, JSON feed, or CSV file into CyberSEO Pro is to select “product” from the Post type drop-down menu.
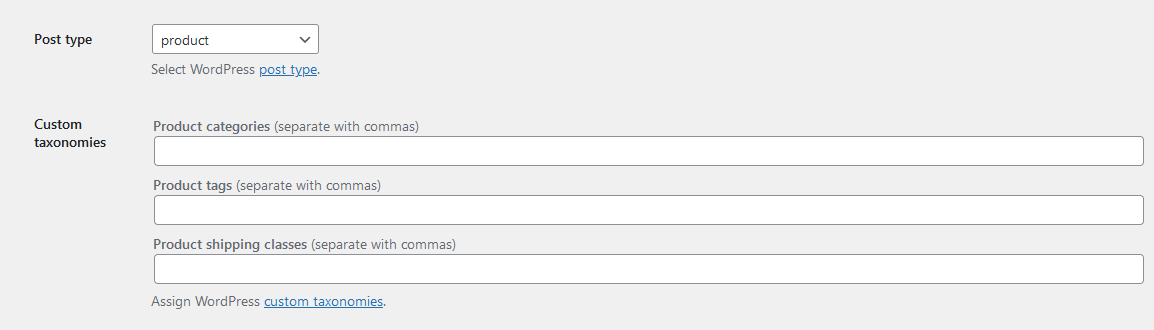
Once you’ve chosen the post type, additional “Custom taxonomies” fields specific to that custom post type will appear. For products, WooCommerce defines these taxonomies as “Product categories“, “Product tags“, and “Product shipping classes“. In these fields, you can specify the categories, tags, and shipping classes you wish to assign to the products being imported from your source.
Of course, the product records you import may already contain their own category information. In such cases, you’ll need to import these as standard WordPress post categories. However, to ensure WooCommerce recognizes them as product categories – i.e., posts of type “product” – you’ll need to check the appropriate boxes to convert these standard WordPress post categories and tags into corresponding WooCommerce taxonomies.

After carrying out the aforementioned steps, you’ll have configured CyberSEO Pro to import content from any specified sources as fully-fledged WooCommerce products.
All product properties in WooCommerce are standard custom fields. Consequently, you can set their values by creating rules in the “Custom Fields” section under the “Advanced” tab in your feed settings. Below is a list of all custom fields used in “product” posts, as defined by the WooCommerce plugin.
total_sales – Monitors the cumulative number of sales for the product. Generally used for internal tracking and not advised for direct editing._regular_price – Sets the baseline price of the product. You can manipulate this field to adjust the regular pricing._tax_status – Specifies whether the product is taxable. Typical values are ‘taxable’, ‘shipping’, or ‘none’._tax_class – Denotes the product’s tax class. This is useful if you have varying tax rates for different product types._manage_stock – Determines whether stock management is active for the product. Accepts ‘yes’ or ‘no’._backorders – Sets the backorder policy for the product. Possible values are ‘no’, ‘notify’, or ‘yes’._sold_individually – Indicates if the product is sold as a single item. Accepts ‘yes’ or ‘no’._virtual – Flags whether the product is virtual, which is useful for services or digital goods._downloadable – Specifies if the product is downloadable. If set to ‘yes’, additional download settings become available._download_limit – Indicates the maximum number of times a downloadable product can be accessed._download_expiry – Sets the timeframe in days before a download link becomes invalid._stock – Represents the current stock level. Edit this field only if you’ve set _manage_stock to ‘yes’._stock_status – Stock status, which can be ‘instock’, ‘outofstock’, or ‘onbackorder’._wc_average_rating – Holds the average product rating. This field is not meant for direct editing._wc_review_count – Stores the count of reviews for the product. Avoid editing this field directly._downloadable_files – Contains serialized array data for downloadable files. Exercise caution when editing._product_version – Stores the WooCommerce version that the product is compatible with, mainly for internal tracking._price – Reflects the current effective price, accounting for both regular and sale prices._wpcom_is_markdown – Indicates if the product description uses Markdown. Usually not intended for manual manipulation._edit_lock – A system field to signal if the product is currently being edited. Do not modify this field._edit_last – Records the ID of the last user who edited the product. Do not modify this field._sale_price – If applicable, this field holds the sale price of the product._product_image_gallery – Contains IDs for any additional product gallery images._thumbnail_id – Stores the WordPress media ID for the product’s featured image.By setting these custom fields’ values directly via CyberSEO Pro, you can fine-tune how your products get imported, automating everything from pricing and tax status to stock management and more. This gives you a robust and streamlined way to manage your WooCommerce catalog.
Let’s assume you have a URL for an XML feed containing a product catalog, formatted according to Google Merchant Center standards:
<?xml version="1.0" encoding="UTF-8" ?>
<rss xmlns:g="http://base.google.com/ns/1.0" version="2.0">
  <channel>
    <title>Sample Product Feed</title>
    <link>http://www.example.com</link>
    <description>Example product list.</description>
    <item>
      <g:id>001</g:id>
      <g:title>Deluxe Stainless Steel Coffee Maker</g:title>
      <g:description>Our Deluxe Stainless Steel Coffee Maker lets you enjoy a barista-level experience right in your own kitchen. With its sleek design and advanced features like a programmable timer and built-in grinder, you can effortlessly brew the perfect cup every time.</g:description>
      <g:link>http://www.example.com/product/001</g:link>
      <g:image_link>http://www.example.com/image/001.jpg</g:image_link>
      <g:brand>Example Brand</g:brand>
      <g:condition>new</g:condition>
      <g:availability>in stock</g:availability>
      <g:price>199.99 USD</g:price>
      <g:sale_price>179.99 USD</g:sale_price>
      <g:color>Stainless Steel</g:color>
      <g:size>Standard</g:size>
      <g:material>Stainless Steel</g:material>
    </item>
  </channel>
</rss>
After adding this feed to the CyberSEO Pro Syndicator, you can view its structure in the “Preview mode: XML Structure” text box:
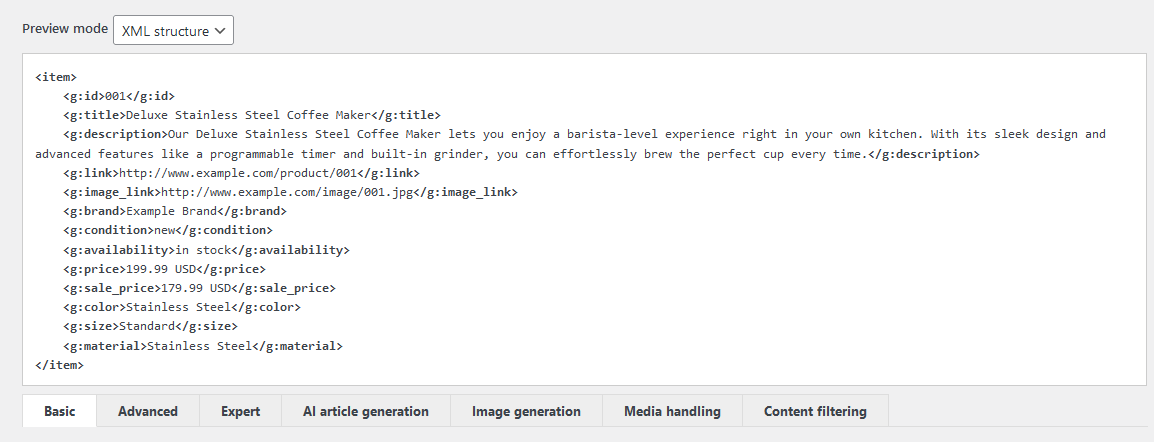
In this case, the product attributes are stored within XML blocks tagged as <item>. However, unlike standard RSS feeds, the field values are stored under non-standard tags. For instance, the title is found under <g:title> instead of <title>, and the description is under <g:description> instead of <description>, etc. This needs to be accounted for when setting up the HTML template for the generated WooCommerce product post.
The first important step in setting up the CyberSEO Pro plugin is to capture the original product URL, ensuring the uniqueness of each imported item in your WooCommerce database. If a duplicate product is detected based on its URL, the plugin will skip adding it again. Although titles can also be used for checking uniqueness, URLs offer a more foolproof method. This is particularly important when two products have the same or similar names but differ in attributes like color, warranting separate URLs.
Beyond URLs and titles, you can also manage various other attributes including pricing details. Navigate to the “Advanced” tab in the feed settings. In the Custom fields section, input the comprehensive mapping rules below:
g:link->%link%
g:title->%post_title%
g:price->_regular_price
g:sale_price->_sale_price
g:sale_price->_price
This way, the content of the XML tag <g:link> will be stored as the source link for our post. Also by using these custom field mappings, you direct the CyberSEO Pro plugin to populate WooCommerce’s _regular_price and _sale_price fields using the corresponding values from the XML feed (<g:regular_price> and <g:sale_price>). This way, not only is each product’s identity maintained, but their pricing information is also dynamically managed, ensuring a seamless import process.
Now let’s construct the HTML template for our generated post, embedding the necessary product data imported from this XML feed.
Navigate to the “Post content” field under the “Advanced” tab. Insert the following shortcode into that field as a guideline for your HTML structure. The word “guideline” here means you’re free to adapt the actual HTML structure to fit your specific needs:
<div class="product-wrapper">
    <img class="product-image" src="%xml_tags[g:image_link]%" alt="%post_title%"/>
    <div class="product-details">
        <h2>Product Details</h2>
        <p>%xml_tags[g:description]%</p>
    </div>
    <ul class="product-attributes">
        <li><strong>Condition:</strong> %xml_tags[g:condition]%</li>
        <li><strong>Color:</strong> %xml_tags[g:color]%</li>
        <li><strong>Size:</strong> %xml_tags[g:size]%</li>
    </ul>
    <div class="product-pricing">
        <p>
            <span class="original-price"><s>%xml_tags[g:price]%</s></span>
            <span class="sale-price"><strong>%xml_tags[g:sale_price]%</strong></span>
        </p>
    </div>
    <div class="product-link">
        <a href="%link%" target="_blank">View Product</a>
    </div>
</div>
Don’t be thrown off by the use of %post_title% and %link% shortcodes. We have already mapped these to the XML tags <g:title> and <g:link>, respectively (remember, we set this up in the “Custom fields” box?). So, in the HTML template above, you could just as easily use %xml_tags[g:title]% and %xml_tags[g:link]% shortcodes with the same effect. This is done merely as an example.
By the way, since we store the product price as WordPress custom fields _price, _regular_price and _sale_price, you can also insert their values into your HTML template using the following shortcodes: %custom_fields[_price]%, %custom_fields[_sale_price]% and %custom_fields[_sale_price]%, respectively.
If you’re importing an XML feed of a different format, or perhaps a JSON feed or a CSV file, the sequence of your actions will be quite similar to what has been described above. This is because the CyberSEO Pro plugin automatically converts any content source you import into XML format. You can check the converted XML structure in the “Preview mode: XML Structure” text field on the settings page of your feed.
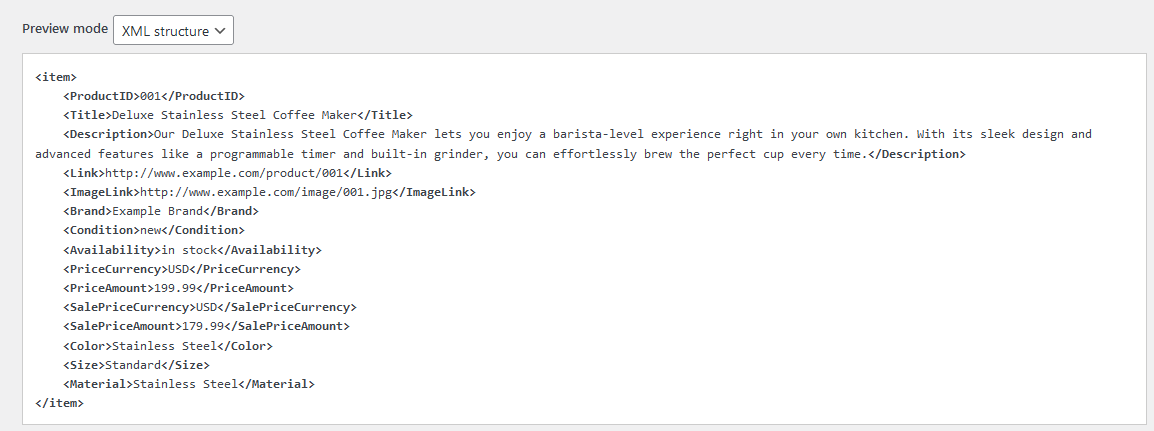
Suppose you’re importing a CSV file, and it has the following structure:
ProductID,Title,Description,Link,ImageLink,Brand,Condition,Availability,PriceCurrency,PriceAmount,SalePriceCurrency,SalePriceAmount,Color,Size,Material
001,Deluxe Stainless Steel Coffee Maker,"Our Deluxe Stainless Steel Coffee Maker lets you enjoy a barista-level experience right in your own kitchen. With its sleek design and advanced features like a programmable timer and built-in grinder, you can effortlessly brew the perfect cup every time.",http://www.example.com/product/001,http://www.example.com/image/001.jpg,Example Brand,new,in stock,USD,199.99,USD,179.99,Stainless Steel,Standard,Stainless Steel
Before importing the URL of this file, tick the Treat as CSV checkbox and click “Syndicate »“. In the “Preview mode: XML Structure” text box, you’ll see its converted XML structure.
Here is how your Custom fields rules should look:
Link->%link%
Title->%post_title%
PriceAmount->_regular_price
SalePriceAmount->_sale_price
SalePriceAmount->_price
And your HTML post template should be something like this:
<div class="product-wrapper">
    <img class="product-image" src="%xml_tags[ImageLink]%" alt="%post_title%"/>
    <div class="product-details">
        <h2>Product Details</h2>
        <p>%xml_tags[Description]%</p>
    </div>
    <ul class="product-attributes">
        <li><strong>Condition:</strong> %xml_tags[Condition]%</li>
        <li><strong>Brand:</strong> %xml_tags[Brand]%</li>
        <li><strong>Color:</strong> %xml_tags[Color]%</li>
        <li><strong>Size:</strong> %xml_tags[Size]%</li>
        <li><strong>Material:</strong> %xml_tags[Material]%</li>
    </ul>
    <div class="product-pricing">
        <p>
            <span class="original-price"><s>%xml_tags[PriceAmount]%</s></span>
            <span class="sale-price"><strong>%xml_tags[SalePriceAmount]%</strong></span>
        </p>
    </div>
    <div class="product-link">
        <a href="%link%" target="_blank">View Product</a>
    </div>
</div>
As you can see, the process remains straightforward, and I’ve just added the ‘Brand’ and ‘Material’ attributes to provide a more complete view of the product.
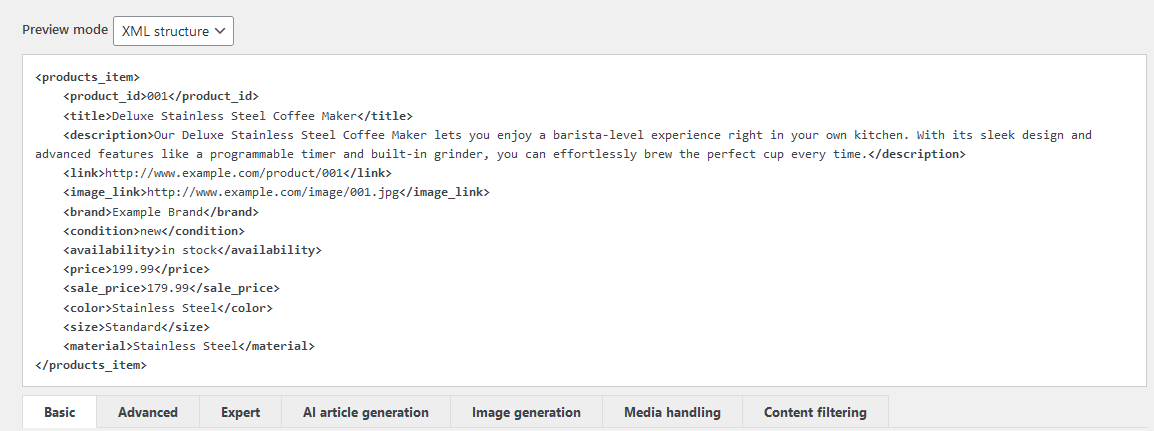
Importing JSON feeds of any internal structure is as easy as importing CSV files. Just add a link to the JSON feed in CyberSEO Pro Syndicator. For example, your feed has the following structure:
{
  "products": [
    {
      "product_id": "001",
      "title": "Deluxe Stainless Steel Coffee Maker",
      "description": "Our Deluxe Stainless Steel Coffee Maker lets you enjoy a barista-level experience right in your own kitchen. With its sleek design and advanced features like a programmable timer and built-in grinder, you can effortlessly brew the perfect cup every time.",
      "link": "http://www.example.com/product/001",
      "image_link": "http://www.example.com/image/001.jpg",
      "brand": "Example Brand",
      "condition": "new",
      "availability": "in stock",
      "price": "199.99",
      "sale_price": "179.99",
      "color": "Stainless Steel",
      "size": "Standard",
      "material": "Stainless Steel"
    }
  ]
}
In the “Preview mode: XML Structure” text box, you’ll see its converted XML structure like follows.
Responsively your Custom fields settings should be as follows:
link->%link%
title->%post_title%
price->_regular_price
sale_price->_sale_price
sale_price->_price
And your HTML post template should be something like this:
<div class="product-wrapper">
    <img class="product-image" src="%xml_tags[image_link]%" alt="%post_title%"/>
    <div class="product-details">
        <h2>Product Details</h2>
        <p>%xml_tags[description]%</p>
    </div>
    <ul class="product-attributes">
        <li><strong>Condition:</strong> %xml_tags[condition]%</li>
        <li><strong>Brand:</strong> %xml_tags[brand]%</li>
        <li><strong>Color:</strong> %xml_tags[color]%</li>
        <li><strong>Size:</strong> %xml_tags[size]%</li>
        <li><strong>Material:</strong> %xml_tags[material]%</li>
    </ul>
    <div class="product-pricing">
        <p>
            <span class="original-price"><s>%xml_tags[price]%</s></span>
            <span class="sale-price"><strong>%xml_tags[sale_price]%</strong></span>
        </p>
    </div>
    <div class="product-link">
        <a href="%link%" target="_blank">View Product</a>
    </div>
</div>
As you can see above, importing any content source supported by CyberSEO Pro plugin is always the same. If you have learned how to import XML, you already know how to import CSV, JSON and even content from social networks. The algorithm of your actions, as well as the settings and tools at your disposal, always remain the same and unchanged.
Let’s assume that the HTML document you are importing, which describes a product, has the following structure:
<!DOCTYPE html>
<html lang="en">
<head>
    <meta charset="UTF-8">
    <title>Deluxe Stainless Steel Coffee Maker</title>
</head>
<body>
    <div class="main" id="product-123">
        <h1 class="product-title">Deluxe Stainless Steel Coffee Maker</h1>
        <div class="product-description">
            <p>Experience the perfect brew every morning with our Deluxe Stainless Steel Coffee Maker. With its state-of-the-art technology and sleek design, it's the ideal addition to any kitchen.</p>
        </div>
        <div class="product-images">
            <img src="http://www.example.com/image/image1.jpg" alt="Front view">
            <img src="http://www.example.com/image/image2.jpg" alt="Side view">
            <img src="http://www.example.com/image/image3.jpg" alt="Top view">
        </div>
        <div class="product-specs">
            <ul>
                <li>Brand: Example Brand</li>
                <li>Condition: New</li>
                <li>Color: Stainless Steel</li>
                <li>Size: Standard</li>
                <li>Material: Stainless Steel</li>
            </ul>
        </div>
        <div class="product-pricing" id="main-price">
            <p>Regular Price: <span class="old-price">$199.99</span></p>
            <p>Sale Price: <span class="new-price">$179.99</span></p>
        </div>
        <div class="product-action">
            <button class="buy-button">Buy Now</button>
        </div>
    </div>
</body>
</html>
Importing such a website with CyberSEO Pro is easy. But how do you pass the price information of the product to WooCommerce? This becomes a bit tricky because the price is embedded in the HTML text and not offered as a separate XML tag in the imported feed. Thus, unlike XML, JSON feeds or CSV files, the product’s HTML page doesn’t easily expose the price information.
In these scenarios, your webmaster skills come into play – you need to understand HTML. If you’re adept at it, you’ll notice that the pricing information (both the original price and the sale price) is contained in these specific lines of HTML code:
<p>Regular Price: <span class="old-price">$199.99</span></p>
<p>Sale Price: <span class="new-price">$179.99</span></p>
All that’s needed is to extract these prices from the HTML code and store their values in the appropriate WooCommerce custom fields. CyberSEO Pro offers you two methods to generate WordPress post custom fields based on data extracted from the imported HTML document. The first approach uses regular expressions, and the second involves searching the content of the outer HTML element. Let’s explore both options.
If you prefer using regular expressions, your rules for the Custom fields would look like this:
regex:Regular Price: <span class="old-price">$(.*?)</span>->_regular_price
regex:Sale Price: <span class="new-price">$(.*?)</span>->_sale_price
regex:Sale Price: <span class="new-price">$(.*?)</span>->_price
Alternatively, if you favor extracting content by searching the outer HTML element’s content, the “Custom fields” box should contain:
span {"class": "old-price"}->_regular_price
span {"class": "new-price"}->_sale_price
span {"class": "new-price"}->_price
Note that in our HTML example, both methods are applicable. However, there might be instances where the HTML markup doesn’t allow content extraction via the outer HTML element’s content search. In such cases, you would have to rely solely on regular expressions.
Since the CyberSEO Pro plugin is fully integrated with all OpenAI GPT models, why not take advantage of this feature to make your imported product descriptions unique? You’ll need to use the [openai_gpt] shortcode for this (see documentation for more details).
To make your imported product descriptions unique and more engaging, all you need to do is replace the following line in your HTML post template:
<p>%xml_tags[g:description]%</p>
With something like this (the GPT prompt is just an example, and you’re free to experiment with it as you wish):
<p>[openai_gpt model="gpt-4" prompt="Write an ad for the product below. Write this ad with creativity and flair, making sure it reads like a human-written text and incorporates keywords in the best way for SEO optimization, be natural: %post_title% - %xml_tags[g:description]%" max_tokens="3500" temperature="0.7"]</p>
Incorporating machine-generated content with an SEO focus can not only make your descriptions unique, but also add a kind of dynamism that a simple import may lack. With features like max tokens and temperature, you can control the length and creativity of the generated text, optimizing it for better search engine visibility. It’s an excellent way to make your WooCommerce store stand out from the crowd, while making the shopping experience more engaging for your visitors.
Developer registration for in-person attendance will open in the coming weeks and developers everywhere will be able to livestream the keynote.